渐显/渐隐LED
演示如何使用模拟输出来淡化 LED。
此示例演示了如何使用 AnalogWrite() 函数使 LED 淡入淡出。 AnalogWrite 使用脉冲宽度调制 (PWM),以不同的开和关比率快速打开和关闭数字引脚,以产生淡入淡出效果。
硬件要求
- Arduino板卡
- LED
- 220欧电阻
- 连接线
- 面包板
电路
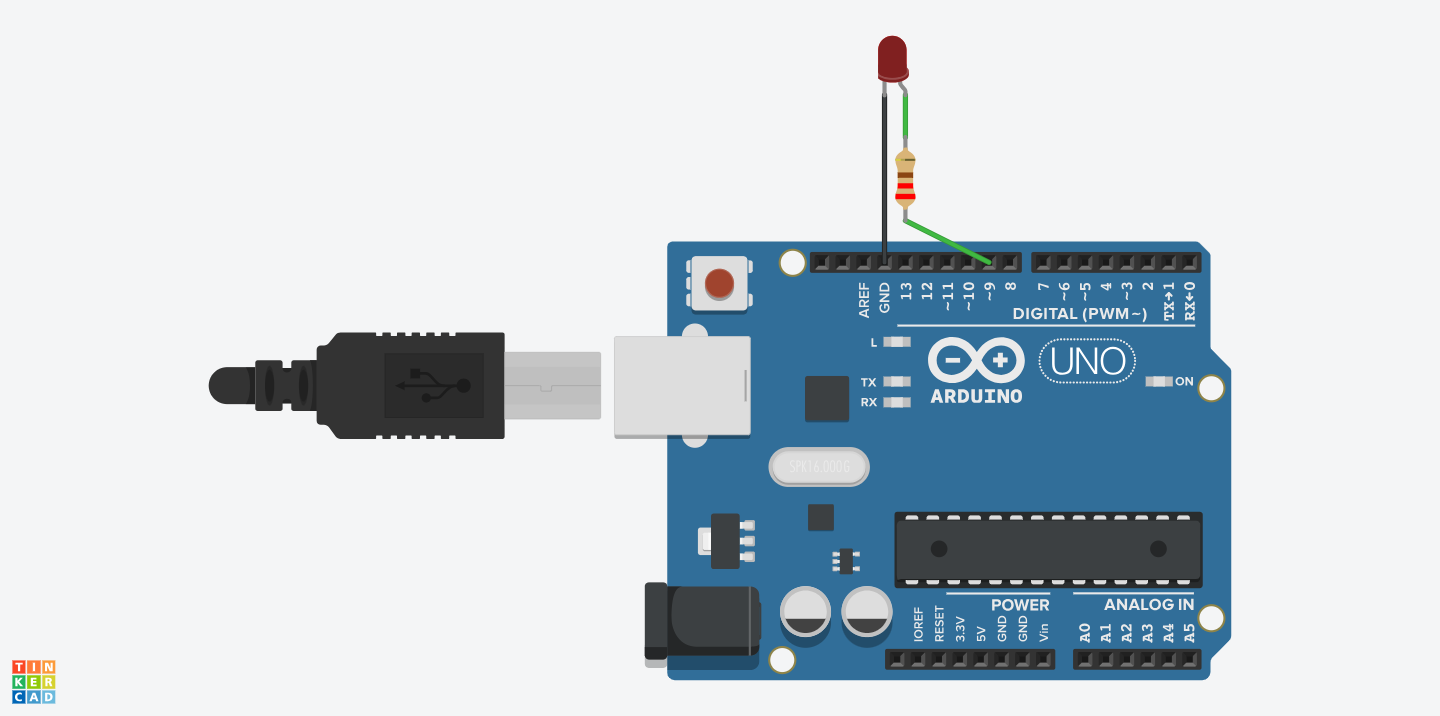
通过 220 欧姆电阻将 LED 的阳极(较长的正极腿)连接到板上的数字输出引脚 9。将阴极(较短的负极腿)直接接地。
在 Arduino Uno 上,可以在数字I/O引脚 3、5、6、9、10 和 11 上进行 PWM 输出。
电路图

代码
我们使用simple_pwm模块中的timer来创建脉冲。simple_pwd为我们提供了3个脉冲时钟对应不同的PWM时钟以对应不同的数字I/O引脚。
- Timer0Pwm:为PWM使用TC0(对应PD5、PD6,即引脚5和引脚6)
- Timer1Pwm:为PWM使用TC1(对应PB1、PB2,即引脚9和引脚10)
- Timer2Pwm:为PWM使用TC2(对应PB3、PD3,即引脚3和引脚11)
我们的LED连接在引脚9上,对应PB1,因此使用Timer1Pwm。
另外,我们还需要通过预分频器设置脉冲产生的频率,频率和时钟的对应关系如下:
| Prescaler | 16 MHz Clock | 8 MHz Clock |
|---|---|---|
| Direct | 62.5 kHz | 31.3 kHz |
| Prescale8 | 7.81 kHz | 3.91 kHz |
| Prescale64 | 977 Hz | 488 Hz |
| Prescale256 | 244 Hz | 122 Hz |
| Prescale1024 | 61.0 Hz | 30.5 Hz |
我们使用Prescale64来设置脉冲时钟,为977Hz,每个脉冲的时间大概为1ms。 我们将引脚9转换为一个PWD输出的LED。
let mut pwm_led = pins.d9.into_output().into_pwm(&Timer1Pwm::new(dp.TC1, Prescaler::Prescale64));此处有两种方式控制LED的变化:
-
使用set_duty() 在程序主循环中,我们通过设置PWD的duty来控制每轮脉冲的占空比,以达到控制LED亮度的目的。每次循环等待10ms,也就是大概10个脉冲
for x in (0..=255).chain((0..=254).rev()) {
  pwm_led.set_duty(x%5);
  arduino_hal::delay_ms(10);
}
编译并运行示例
cargo build
cargo run
完整代码如下:
src/main.rs
/*! * Demonstrates the use of analog output to fade an LED. * * This example demonstrates the use of arduino_hal::simple_pwm::IntoPwmPin trait to convert pin to a PWM pin and * use set_duty() function in fading an LED off and on. * simple_pwd module uses pulse width modulation (PWM), turning a digital pin on and off very quickly with different * ratio between on and off, to create a fading effect. */ #![no_std] #![no_main] use arduino_hal::simple_pwm::*; use panic_halt as _; #[arduino_hal::entry] fn main() -> ! { let dp = arduino_hal::Peripherals::take().unwrap(); let pins = arduino_hal::pins!(dp); // Digital pin 9 is connected to a LED and a resistor in series let mut pwm_led = pins .d9 .into_output() .into_pwm(&Timer1Pwm::new(dp.TC1, Prescaler::Prescale64)); pwm_led.enable(); loop { for x in (0..=255).chain((0..=254).rev()) { pwm_led.set_duty(x); arduino_hal::delay_ms(10); } } } -
使用embedded_hal的trait
注意:此处需要修改模版项目依赖中的embedded_hal为最新版本
创建一个embedded_hal兼容的arduino::Delay变量
let mut delay = arduino_hal::Delay::new();设置LED的duty循环的百分比,并使用delay来控制延迟
for pct in (0..=100).chain((0..100).rev()) {
	led.set_duty_cycle_percent(pct).unwrap();
	delay.delay_ms(10);
}
编译并运行示例
cargo build
cargo run
完整代码如下:
src/main.rs
/*!
 * Demonstrates the use of analog output to fade an LED.
 *
 * This example demonstrates the use of arduino_hal::simple_pwm::IntoPwmPin trait to convert pin to a PWM pin and
 * use set_duty() function in fading an LED off and on.
 * simple_pwd module uses pulse width modulation (PWM), turning a digital pin on and off very quickly with different
 * ratio between on and off, to create a fading effect.
 * this app is not aware of `avr-hal` and only uses `embedded-hal` traits.
 */
#![no_std]
#![no_main]

use arduino_hal::simple_pwm::*;
use embedded_hal::delay::DelayNs;
use embedded_hal::pwm::SetDutyCycle;
use panic_halt as _;

#[arduino_hal::entry]
fn main() -> ! {
    let dp = arduino_hal::Peripherals::take().unwrap();
    let pins = arduino_hal::pins!(dp);

    // Digital pin 9 is connected to a LED and a resistor in series
    let mut pwm_led = pins
        .d9
        .into_output()
        .into_pwm(&Timer1Pwm::new(dp.TC1, Prescaler::Prescale64));
    pwm_led.enable();

    let mut delay = arduino_hal::Delay::new();

    loop {
        for pct in (0..=100).chain((0..100).rev()) {
            pwm_led.set_duty_cycle_percent(pct).unwrap();
            delay.delay_ms(10);
        }
    }
}
此时,你可以看到LED逐渐变亮,然后变暗。